Identifying Paint Problems
You’ll need to clean and prep the surface, decide what type of paint to use, and apply the paint. The best time to paint is in late spring or early fall on a dry day that is not too sunny. Temperatures below 40 degrees F and direct hot sun can ruin paint jobs. Inspect your house thoroughly before you paint, and take corrective action to prevent the root causes of paint failure. Following are tips on dealing with various paint problems.
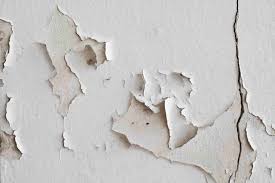
Peeling
Peeling is often the result of painting over wet wood. It can also result from moisture within the house pushing its way out. If you cannot control the moisture with exhaust fans, use latex primer and latex paint. Latex allows some moisture to pass right through the paint.
Another cause of peeling is a dirty or a glossy surface. To undo the damage, all loose paint flakes must be scraped off with a wire brush and the surface must be sanded to smooth sharp edges. Bare spots should be primed before painting.
Alligatoring
This problem looks just like its name suggests: the hide of an alligator. Paint shrinks into individual islands, exposing the previous surface, usually because the top coat is not adhering to the paint below. Perhaps the paints are not compatible or the second coat was applied before the first coat had dried. To get rid of this problem, scrape off the old paint and then sand, prime, and repaint the surface.
CRACKING / FLAKING
The splitting of a dry paint film through at least one coat as a result of aging, which ultimately will lead to complete failure of the paint. In its early stages, the problem appears as hairline cracks; in its later stages, flaking occurs.
POSSIBLE CAUSES:
Use of lower quality paint that has inadequate adhesion and flexibility.Overthinning or overspreading the paint.Inadequate surface preparation, or applying the paint to bare wood without first applying a primer. Excessive hardening and embrittlement of alkyd paint as the paint job ages.
FOAMING / CRATERING
Formation of bubbles (foaming) and resulting small, round concave depressions (cratering) when bubbles break in a paint film, during paint application and drying.
FRAMING
Appearance of a denser colour or increased gloss where wet and dry layers overlap during paint application.
POSSIBLE CAUSES:
Failure to maintain a “wet edge” when painting. Use of a low solids “economy” paint.
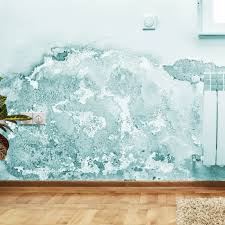
Efflorescence
A problem of painted masonry construction, efflorescence is identified by crusty white salt deposits bubbling through the paint film from an underlying masonry structure. It is caused by salts in the brick or concrete dissolving with water and then leaching to the surface as the water evaporates.
Possible Causes
- Surface preparation was poor; prior efflorescence was not entirely removed and washed before the surface was repainted.
- Heavy moisture migrated through exterior masonry walls from inside the home.
- Inadequately waterproofed basement walls allowed groundwater penetration.
- Masonry was painted before the concrete or mortar had adequately cured and dried out.
- Cracks in the masonry wall or poor tuckpointing have allowed water to get behind masonry wall.
Sagging or Running
This paint failure is easily identified as paint film with a droopy, dripping appearance.
Possible Causes
- Application of a coat of paint was too heavy or overloaded.
- Paint was thinned too much at the time of application.
- The paint was applied in poor environmental conditions, such as when temperatures were too cool or when humidity was too high.
- The paint was applied to a high-gloss surface that was not first primed. This prevents the paint substrate from having the “tooth” necessary for the finish coat to adhere.
- Painted surface was not clean or properly prepared at the time of application.
Rust Discoloration
This problem is characterized by rust-colored, reddish-brown to black stains on the paint surface.
Possible Causes
- Non-corrosion-resistant nails were used to attach siding, rather than galvanized zinc-plated or stainless steel nails.
- Steel nails have come into contact with the air.
- Steel nails have popped up from below the surface.
- Excessive weathering or sanding has worn away galvanized coating on nail heads.
- Tannic acid from moist wood (e.g., oak) has reacted with steel nails, creating a black stain.
Cleaning Mildew and Chalk from Exterior Surfaces for Painting
Preparing your home’s exterior before you paint is essential. Most of the time, cleaning is straightforward, but some circumstances, like mold and mildew and chalky residue, might require some special treatment. Here are tips for battling mildew stains and ridding your home of the chalky dust.
A brown, gray, or black stain on siding or trim may be simple grime, or it may be mildew. To test whether a stain is grime or mildew, try washing the stain away with water and a detergent like Spic and Span. If the stain doesn’t wash away with water and detergent, it’s probably mildew.
Because mildew is a fungus growth, it thrives on moisture and dirt, so keep the siding open to the sun and air. Don’t store firewood or other materials close to the house. Prune tree branches that shade the house. If you have recurring mildew problems, power-wash the house’s exterior once a year and apply a mildewcide solution every two to three years.
How to Fix Dried Out Paint in a Can
You may be disappointed to open an old can of paint only to find that the paint has dried in the can. While some people may be quick to simply set the paint can out on the curb with the rest of the trash, you may surprised to know that you can fix the dried paint if it is an oil-based paint. The resulting paint won’t be the same quality as the original paint, but it will work well for touch-ups or for covering if you apply several coats. Dried latex paints cannot be fixed so they should be discarded.
Step 1
Place the open paint can on a plastic sheet to protect your work surface from paint stains.
Step 2
Pour 1 oz. of paint thinner into the paint can. Use more or less depending on the amount of paint in the can, but it is best to start with a smaller amount and work up to your desired result.
Step 3
Stir the paint thinner into the dried paint with a paint stirrer or clean stick until the paint is too thick to stir.
Step 4
Add a 1/2-oz. to 1 oz. more of the paint thinner and stir the paint well.
Step 5
Continue to add more paint thinner a 1/2-oz. at a time until you have thinned all the dried paint and achieved the desired consistency.